French Manicure with Sally Hansen [Review]
I have always loved french manicure with basic white tip. It's just so classy, neat and sophisticated. While I was a Brand Knights for Yuberactive, one of the product that I chose among the RM500 worth of Sally Hansen goodies was this set of Sally Hansen Hard as Nails French Manicure Kit.
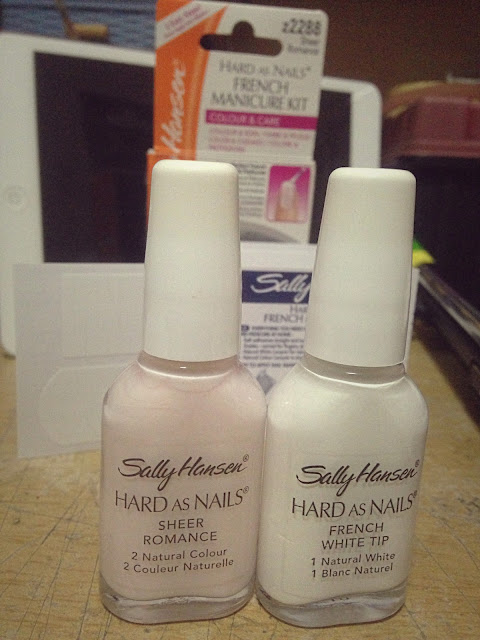
It comes with:


xo,

My Twitter | My Bloglovin | My Nuffnangx
It comes with:
- A French White tip polish
- A Sheer Romance polish
- A guide paper & guide stickers

I have been trying to perfect my free hand french manicure white tip for ages and I admit that I'm average with my right hand but I'm still fairly poor with my left hand. I'm not sure why I don't prefer using the sticker guide for the french tip which yes, it does make things a lot easier and way faster. I tried one of te sticker on my pinky finger and it look great and neat when peeling it. Of course, it is common sense to let the lacquer completely dry before peeling the sticker off or else we are just going to mess it all up. Whatever it is, if people wants to see my french nails, I will just extend my left hand to protect my awesome-ness in painting my nails. :p
The steps are simple and straight-forward:
- Stick sticker guide onto your nails. Usually, I will just stick it right at the visible line where it separates your nail plate and distal edge or another word "Free Edge". (Okay, I google "Nail Anatomy Diagram" as I couldn't figure out the words for this)
- Then paint the free edge with French White Tip. Tips to paint it with a thin layer and go back again to paint a second thin layer or else the tip will look fat, ugly and not natural when it is super thick. Don't be greedy or impatient. It takes patience with this.
- Then once the 2 coats french tip is dry, peel the sticker guide off gentle and slower. Treat it as your special baby or masterpiece. If you think the edges are a bit rough, just use your fingers to tap it. Fear not as it may look overly white at this point.
- Paint the Sheer Romance thinly, also have it in 2 coats. It will soften the super white look of the tip and the rough adges making it look natural.
- If you are interested and hardworking or "kiasu", you can always paint a top coat on it to finish it up. I didn't because I was just plain lazy.
- You are done!


I guess the best part about these Sally Hansen french manicure polishes is that they are not thick. Rather thin in consistency in fact which is great for painting thin coats for a pretty finish. The brushes are commonly long but it is surprisingly perfect for my use. They are quite big in bottle thus it can probably last you forever. Though, I can't bet that it will stay thin in consistency forever, it is in their nature to thicken and becomes gooey after opening and being expose to our filthy air.
It can be a fun process for those vain pots and a pain for those without the patience. For a girly girl, learning a new nail art skills is extremely fun and exciting. Also, practice makes perfect. Just try it! or else, you can always just opt for it done at the salon. Haha!
xo,
My Twitter | My Bloglovin | My Nuffnangx


Comments
Laura, yup, focus on the nails, not my expression
. Lols!